How to Change a Radiator Valve (Step by Step Guide)
This is the step by step guide to changing a radiator valve.
Whether you’re repairing a faulty radiator valve or replacing an old-style valve with a thermostatic valve, this guide covers the replacement instructions in 10 simple steps.
Let’s get started.
How does a radiator valve work?
Before replacing a radiator valve, it might be useful to learn what the valve does and how it works (if you already know this stuff, feel free to skip to the steps below).
What does the valve do?
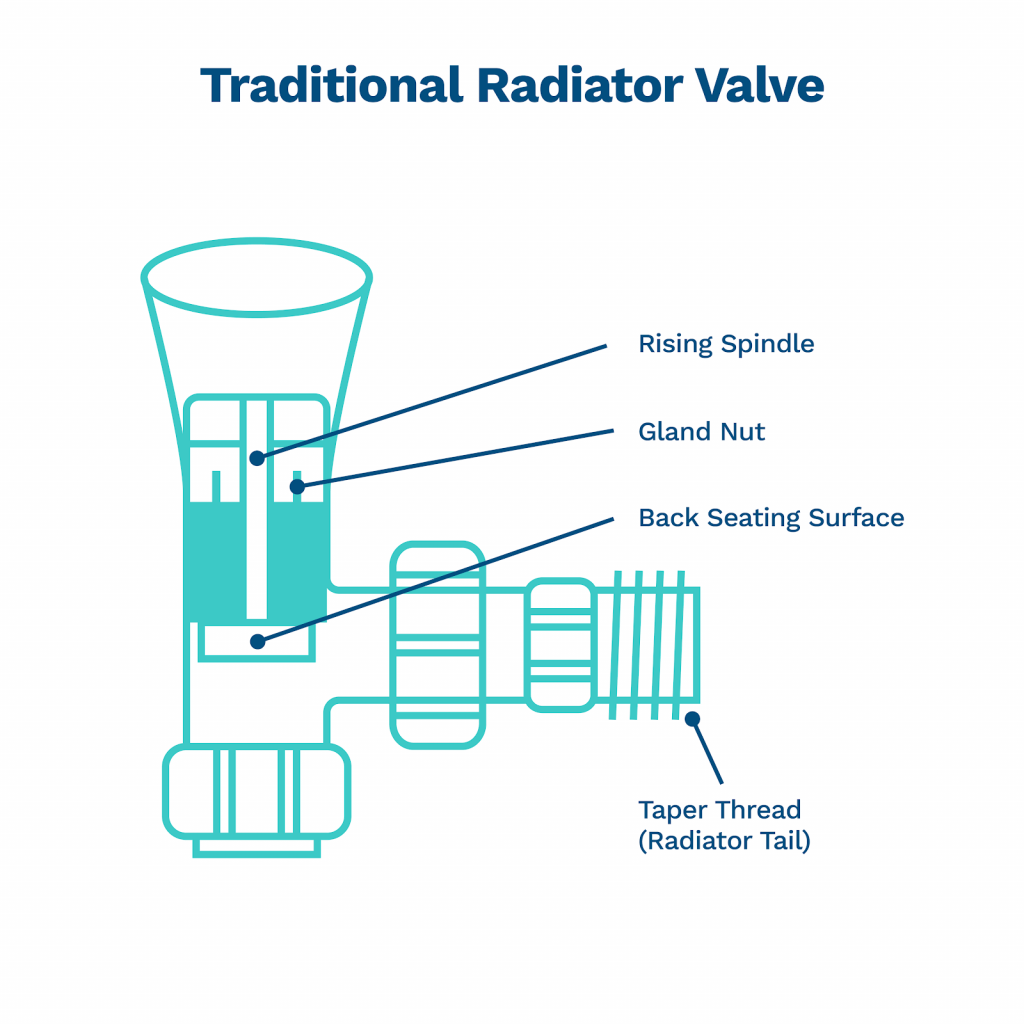
Radiator valves regulate the temperature of your radiator. They do this by regulating the amount of water that enters the valve (traditional radiator valve) or regulating the temperature of the radiator itself (thermostatic valve).
How does it work?
A traditional radiator valve works pretty much like a tap. The further you open the valve, the more water that enters the radiator, the warmer it gets. The further you shut off the valve, the less water that enters the radiator, the cooler it gets.
Thermostatic valves are a little more advanced and have sensors that measure the temperature of the water inside the radiator. You set the thermostat to a certain temperature and the sensor ensures the water doesn’t rise above or drop below this temperature. When it does rise or drop below your desired temperature, the valve opens or closes to allow more or less water into the radiator.
What Tools Do I Need to Replace a Radiator?
Before you start replacing a radiator valve, it’s important that you have the right tools to carry out the job. Ensure you have the following tools available:
- Towel
- Washing Up Bowl
- Hose
- Hex key
- Plumber's wrench
- Adjustable spanner
10 Steps to Replacing a Radiator Valve
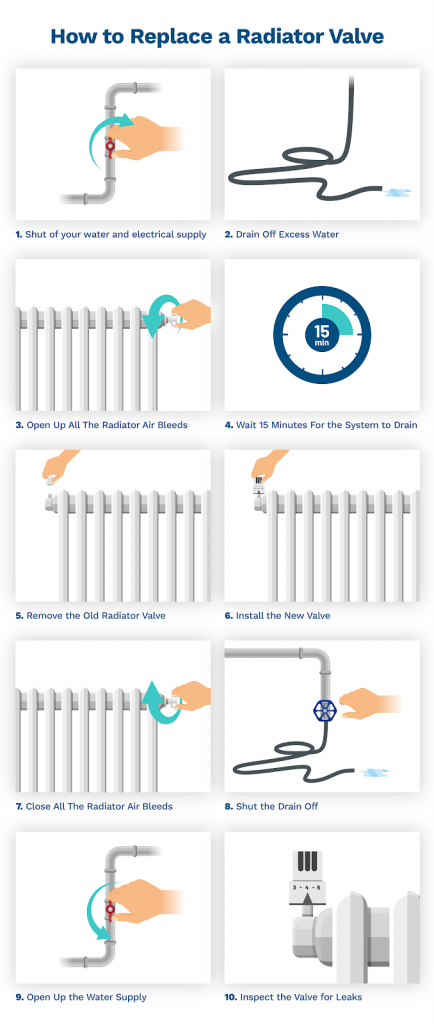
Step 1: Shut off your water and electrical supply
Before you do anything, you need to ensure that the water and electrics are completely shut off. Turn off the water at the stop cock and the electricity at the fuse box. Make sure all your thermostats are turned down and that everyone in the house is aware that you’re working on the radiators.
Step 2: Drain Off Excess Water
You then want to find the drain off closest to the radiator you want to work on. The drain off must be below the radiator. You then want to:
1. Attach your hose to the end of the drain off
2. Place a small towel under the hose (to avoid water dripping onto the carpet)
3. Take the hose outside
From there, simply open up the drain off with an adjustable spanner and the water will begin to drain outside.
3. Open Up All The Radiator Air Bleeds
You then want to open all radiator air bleeds in your home. We do this because it prevents water entering the system, helps drain any excess water and, more importantly, it stops the radiator system pulling a vacuum, which means the system holds water further up in the system, only to let it go when you’re removing the valve.
4. Wait 15 Minutes For the System to Drain
You then want to give it a good 10 to 15 minutes for the system to drain down completely. After a quick brew, you’re ready to start removing the old radiator valve.
5. Remove the Old Radiator Valve
Get a pair of grips on the body of the radiator valve and push down to release the nut closest to the radiator. Before you take the nut off completely, loosen the opposing nut under the radiator valve. From here, you should just be able to slacken off both nuts by hand. The radiator valve should simply pop off.
Be aware that you might have some leftover water in the valve, so just be ready with your towel and washing up bowl to mop anything up.
6. Install the New Valve
Now you just need to reverse the process and install the new valve. The valve should just pop on and all you need to do is tighten the nut bolts.
Step 7. Close All The Radiator Air Bleeds
Now that the valve is installed, you need to go around your home and close all the radiator air bleeds. Do not forget any - make sure you double and triple check them all. Once you refill the system, it’s likely your radiator will flood if an air bleed is still open.
Step 8. Shut the Drain Off
You now want to go to drain off and shut that off, remove the hose and mop up any water that may have overspilled. Again, double and triple-check that the drain off is completely shut off.
Step 9. Open Up the Water Supply
Now you want to go to your stop cock and open back up your water supply. You then want to go around the home opening up each radiator and waiting with it until the radiator starts to warm. This is what we call bleeding the system. For more information on bleeding a radiator, read the guide here.
Step 10. Inspect the Valve for Leaks
You then want to perform a quick check of your new valve and ensure you don’t have any leaks. If you have leaks, then you might need to perform the process again and figure out why the valve isn’t flush against your radiator.
Free Advice
If you’re struggling for advice regarding your replacing your radiator valve, ring our dedicated experts on 0800 112 3134 or 0333 577 3134. We’re open Monday to Friday 07:00 - 17:30 and Saturday 08:30 - 12:30.


